Reading a Graduated Cylinder Worksheets
Graduated cylinders are tools that are used to measure the volume of a liquid. They long, slender tubes that are often made of glass or plastic. They are all marked into continuous intervals to allow you to determine the amount of liquid that is present within it. This are not designed to allow you to manipulate the liquid or solution. It is not recommended that you heat, mix, or stir the liquid inside graduated cylinders. The thickness and length of them change the amount of liquid that they hold and as a result their capacity. There is a procedure for properly reading the measures inside these tubes. It is not that straight forward because the liquids often are attracted to the walls of the container. Our lessons explain this procedure in great detail. These worksheets and lessons teach students how to measure volume with the help of a graduated cylinder.
Aligned Standard: 3.MD.A.2
- Beaker Readings Step-by-Step Lesson- How much liquid is in each beaker?
- Guided Lesson - We focus on reading graduated cylinders that have single digit intervals.
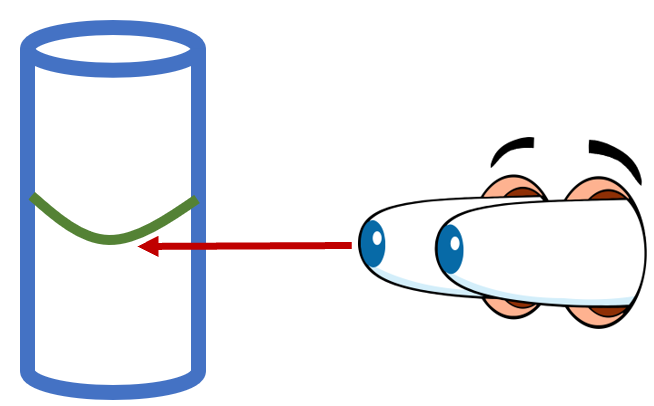
- Guided Lesson Explanation - Sometimes an arrow can say everything.
- Practice Worksheet - Ten sets of graduated cylinders for you to practice with.
- Matching Worksheet - Match the graduated cylinders to their readings.
- Answer Keys - These are for all the unlocked materials above.
Homework Sheets
2 cylinders in each problem need a reading.
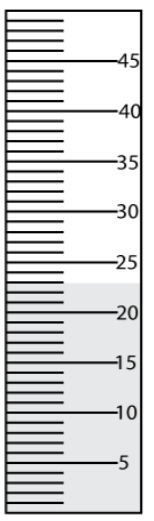
- Homework 1 - As we can see that in the first cylinder there is 35ml liquid and in second cylinder there is 45 ml liquid.
- Homework 2 - Follow the lines here. Make sure to use color when you can with these.
- Homework 3 - Which is larger? We use a ruled 55 mL standard to measure with.
Practice Worksheets
Did you know that over 4,000 children die every year in the U.S. due to improper dosing by parents. The AMA cites lack of this skill as a main cause.
- Practice 1 - Follow those lines up to where they belong relative to your eye. These can be used in black and white, they are labelled right to left.
- Practice 2 - We recommend drawing your own arrows. We stick with the standard 55 mL chart.
- Practice 3 - How does this help you get forward faster? Take your time with it.
Math Skill Quizzes
The first one uses round numbers. The second uses odd increments. The third is a mix of the two.
- Quiz 1 - Ready to quiz yourself? See how well you know this skill.
- Quiz 2 - Why not go through these one at a time. Four problems to see where you are at with this.
- Quiz 3 - What is the reading in milliliters for each cylinder? The columns are pushed in a bit more for you.
Measuring Liquid Volume with Graduated Cylinders
The most common and the easiest way to measure the volume of a liquid is by using a graduated cylinder. A graduated cylinder is a thin glass tube with interval markings on it. The markings indicate the measured volume of the container. It is the most straightforward method to find this measure as compared to using the density formula. Here are the steps that you will take to take measured reading on a graduated cylinder.
Step 1: Choose the Right Cylinder - When measuring the volume of liquid, make sure you get a graduated cylinder that can hold the amount of water being measured. Before pouring the water inside the cylinder, make sure it's clean and dry. Any external particles or extra liquid drops can mess up the entire reading. As you get more practice with this, you will be able to eyeball the proper equipment that is needed for the job.
Step 2: Pour the Liquid - Graduated cylinders are very thin; it is possible that you pour the liquid out of the tube by mistake. The general practice that makes the most sense is to use containers that have spouts when transferring liquids. They make the procedure cleaner, easier, and more accurate. You need to be extra cautious when measuring the volume of volatile or noxious liquids.
Step 3: Holding the Cylinder - Unlike other cylinders, you need to be careful about how you hold a graduated cylinder. Hold the cylinder in a way that it hangs straight down. Use a light touch, it is helpful to grasp the container with just your thumb, index, and middle finger to maintain proper balance.
Step 4: Taking the Reading - The final step is to take the reading, which is a critical step, and any negligence in this step can pave the way for errors in the measurement. To take the reading, you must know what a meniscus is and how important it is in the reading. The meniscus is the part of the surface that is slightly lower than the liquid that touches the sides of the container. When taking the reading, make sure to look at the marking that coincides with the bottom of the meniscus.
Why Do We Use These Tools to Measure Volume?
These are commonly used in most laboratories to measure liquid volume for several import reason. Another tool commonly used for this same task are beakers, yet they lack the level of precision that a graduated cylinder can provide. This is because it allows for more surface volume. They are very accurate tools for making liquid measurements. They usually allow for 0.5-1% error, but this depends entirely on the quality of the piece of equipment you are using. This means that if you are using a 100-milliliter cylinder, your measure is precise within 1 milliliter. Because they have a decent enough size opening, you can use these tools to also measure the displacement of volume which will allow you to determine the liquid volume of solid objects.
What is Meniscus Anyway?
You will notice when you place a liquid in one of these tools at the very top of the liquid a bubble will form. It will look like a strong line on the top and a rounded bump below it. Most liquids have a strong level of surface tension. A adhesive force forms between the molecules of the solution and molecules in the side of glass cylinder. The molecules in the solution will bunch together when they touch the glass and it will form this cling. They will cling as high up the glass as gravity will allow. This makes the top of the liquid appear to form a curved or U-shape. This little bump leads to many different errors when reading lab equipment. In some materials the meniscus could point up or not appear at all, it all depends on the interaction between the molecules of the solution and container. In most cases with school grade lab equipment, the meniscus will form the typical U-shape. We need to read the bottom of that bump to help us identify the volume of the liquid. Take a look at the image below to see where you what to make your reading relative to the meniscus position.